Share this blog with your friends
0
Creating a Smoke Fading Effect
By Johnson Koh
Preparations
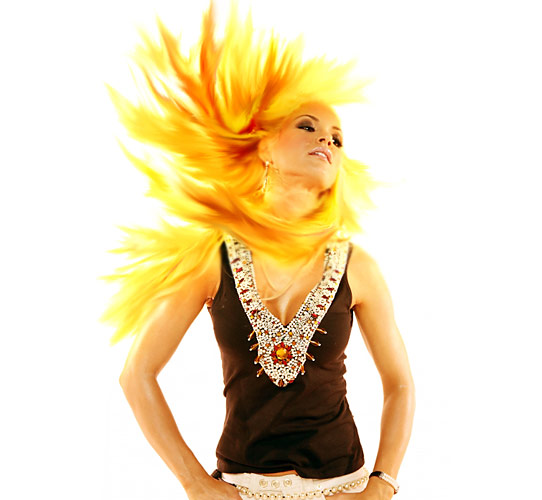
We will need a close up image of a model, and also the awesome Smoke Brushes Set 1 designed by Falln-Stock.
All rights of these resources belong to their respective owners.
Step 1 – Setting Up Environment
Create a document of size 750 by 550px.
Use Gradient tool with foreground color #2B2B2B and background #000000, start a linear gradient from the bottom-left.
Step 2 – Adding Clouds
Create a new layer on top of the Background. Set the foreground color to #000000 and background to #FFFFFF.
Go to Filter > Render > Clouds. Set the blending mode of this layer to Color Dodge.
Use Soft Eraser tool of size 300px, remove some parts of the clouds as shown in the diagram.
Step 3 – Cropping the Model
Crop your model out with Pen tool and place it close to the clouds on the left.
Click here to view more methods for extraction.
Step 4a – Creating Smoke
Duplicate the model layer and use the Rectangular Marquee tool to select the right half of the duplicated model.
Go to Edit > Free Transform and stretch the half of model’s face to the right as shown in the diagram.
Use Soft Eraser tool of size 300px, fade off the right part of the stretched image.
Step 4b – Creating Smoke
Go to Filter > Distort > Wave.
Set the Generators to 5, Type to Sine, Min Wavelength to 10, Max Wavelength to 120, Min Amplitude to 5, Max Amplitude to 35 and both Scale to 100%.
Step 4c – Creating Smoke
Hide the wavy model for the time being and create a new layer on top of it.
Paint a large smoke with color #FFFFFF on the new layer. Position it near to the face as shown in the diagram.
Step 4d – Creating Smoke
On the same layer, paint in more smoke of various shapes and sizes.
Note that the smoke has to be connected or close to the skin for better results.
Step 4e – Creating Smoke
Ctrl+left click on the smoke layer to load selection on its luminosity.
Unhide the wavy model and apply a layer mask on it with the selection. Delete the smoke layer once the layer mask is created.
See the layer shown in the diagram.
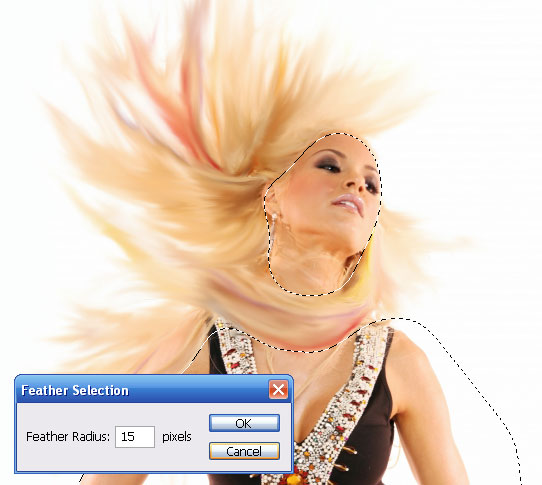
Step 5a – Fading Model
Create a new layer above the original model.
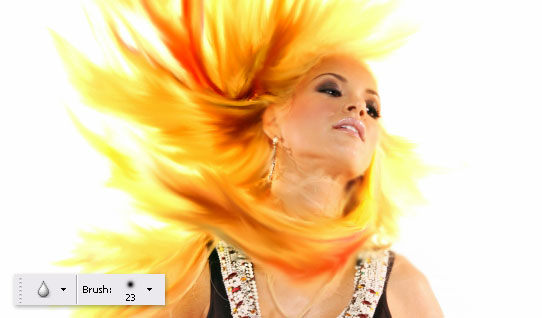
Use Smoke Brushes of color #FFFFFF, paint in large smokes on the face of the model on the new layer.
Step 5b – Fading Model
Ctrl+left click on the new smoke layer to load selection on its luminosity.
Select the original model layer and apply a layer mask on it with the selection. Delete the smoke layer once the layer mask is created.
See the layer shown in the diagram.
Step 6 – Apply Outer Glow
Right-click on the original model layer and choose Blending Options.
Activate Outer Glow and set the color to #FFFFFF, mode to Color Dodge and size to 5px.
You can see a nice glowing border around the edge of the face blending with the clouds at the background.
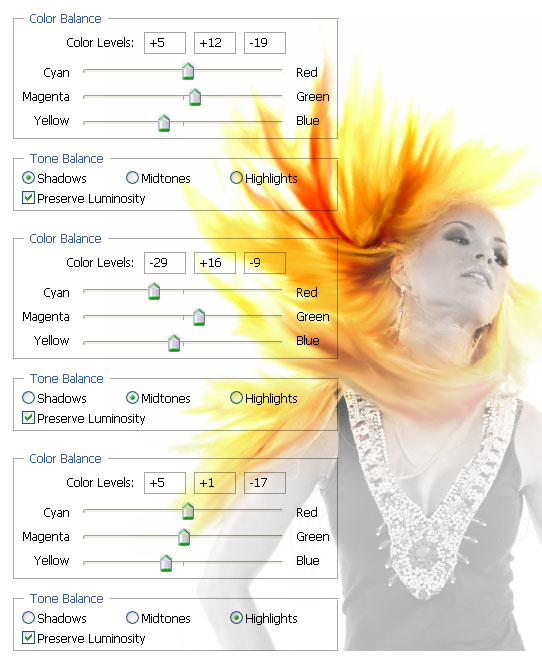
Step 7 – Adjusting Colors
Create a new Levels Adjustment Layer at the topmost and key in the values 40, 0.75, 255.
Create another Hue/Saturation Adjustment Layer above the Levels. Key in the Hue as 190, Saturation as 25 and Lightness as 0.
Optional
You can paint the eyes white to achieve a more mystery feel. Lastly, add some texts to complete the design!
Click here to view the final image.
Originally published at :
http://10steps.sg/tutorials/photoshop/creating-a-smoke-fading-effect/
0

With the help of Photoshop, going from brunette to blonde can be done in a few simple steps. Here's a quick tutorial demonstrating how to achieve this with convincing results.
Now that you have your hair selected, press CTRL + L to load up the Levels menu. What we're doing here is brightening the hair's midtones and highlights. This is done by moving the midtone and white point sliders to the left. Adjust the sliders to your liking until you find the shade you're looking for.
That should do it. For some more fun, open the Color Balance menu by pressing CTRL + B to add some amber hues.
Photoshop Tutorial : Quick Brunette to Blonde

| First load up your image in Photoshop and start by selecting the hair you want altered. You can accomplish this by using the pen tool or a selection tool, it's up to you. If you're using the Pen tool, be sure to right-click and "Make Selection" when finished. Now Feather (ALT + CTRL + D) your selection slightly, with a value of 2 or 3. | ![]() |
Now that you have your hair selected, press CTRL + L to load up the Levels menu. What we're doing here is brightening the hair's midtones and highlights. This is done by moving the midtone and white point sliders to the left. Adjust the sliders to your liking until you find the shade you're looking for.
You may have noticed some parts of the hair have become oversaturated. While your hair is still selected, find the Sponge tool -- usually grouped with the Dodge and Burn tools -- and set the Mode to Desaturate, with a Flow of about 20%. Lightly brush the problem areas until they match the rest of the hair.
![]() |
That should do it. For some more fun, open the Color Balance menu by pressing CTRL + B to add some amber hues.
![]() |
0

This effect relies on a good photo. You're going to a shot of some long hair, preferably flowing in the wind or tossed in the air. Blonde hair is going to work best, so if your model has darker locks, try changing it to blonde in Photoshop. 


Follow the hair's natural direction as shown in the illustration below (notice the wavy black strokes). Once you've touched every strand, duplicate your layer and use a larger diameter brush to go over the hair again. Be careful not to touch the ears or skin.
When your satisfied with your wispy hair, use the Polygonal Lasso Tool to select the hair -- you don't need to be exact here. Now Feather your selection by 15 pixels.

With your hair selected, bump up the brightness by +9, and the contrast by +41. These settings will vary depending on your image -- we're just trying to intensify the hair. Now comes the color correction. Make the hair glow by adding yellow shadows and highlights. Play with the settings until you've got your fire.
All of this fire will create heat, so take the Blur Tool and add some blurry spots to the edges of the face and neck.

For some final enhancements, use the brush tool with a bright yellow and feather in a few hot spots on a new layer. Blur this layer and change the Blending Mode to Overlay.
That should do it. Add an overall yellow hue to your final image and put on your shades!

Photoshop Tutorial : Phoenix Hair Effect
With some simple brushing techniques, and a bit of color tweaking, you can spice up your photos with this flaming hair tutorial.


| The majority of the work in this involves brushing the hair with the Smudge Tool. Use a grungy brush, with a small diameter and 50% strength to start. Begin towards the head and brush outwards, creating organic flowing movements. | ![]() |
When your satisfied with your wispy hair, use the Polygonal Lasso Tool to select the hair -- you don't need to be exact here. Now Feather your selection by 15 pixels.

All of this fire will create heat, so take the Blur Tool and add some blurry spots to the edges of the face and neck.

That should do it. Add an overall yellow hue to your final image and put on your shades!

0
Then select the Brush Tool (B) and set your diameter to 7px, with the Opacity and Flow at 100%, and your foreground color set to white. With your path still on the artwork, go back to the Pen Tool, right click on the canvas, and choose "Stroke Path." A menu will appear with the Brush set as the Tool. Check "Simulate Pressure" and press OK. This will make the beginning and end of your stroke thinner.
Now you need to delete the parts you want hidden behind the arm. With your stroke layer selected, choose "Add layer mask" at the bottom of the Layers Palette. Use the Polygonal Lasso Tool (L) to select areas of the arm you want in front of the stroke -- use your eye and imagine how this path will wrap around the arm. Make sure your mask is active by clicking on it, and fill these selected areas with black. They should now be cut out, appearing as if they're behind the arm.
Right click on your stroke layer and choose Blending Options. A Layer Style menu will appear, where you'll be adding an Inner and Outer Glow to the stroke, making the edges of it glow with a blue hue. Use the settings below:

Make a copy of your stroke layer and right click on the Layer Effects icon. Choose "Clear Layer Style" -- we simply want to blur this layer (about 6 pixels) to add another layer of glow. Everything's looking nice and illuminated here, so let�s add some sparkles. With your Brush Tool, add some quick spots around your glowing path with varying small brush sizes (3 - 5px). Make as many as you want here, as you're always free Erase undesired sparkles.

We're now going to make a secondary stroke to create another level of motion. Use the Pen Tool to go over your original path, but make it a bit different and overlap parts. Select a smaller diameter brush this time with a 50% opacity, and stroke the path as before. 
Our energy beam is nearly there. To make the effect more dramatic, you can adjust the overall hue of your photo. Create a new Curves adjustment layer, and tweak the colors to get a vibrant blue atmosphere. Download the Curves preset below to load it in your document. After your colors are locked in, use the Dodge Tool (O) (with a diameter of 35 pixels and the exposure set to 25%) to brush in some highlights underneath your beam, directly on the background photo. This makes it appear as if your beam is casting light on to the arm.
Download blue.acv For the last part of this effect, we'll add one more layer of shimmer. Hold down Ctrl and click on your main stroked path in the layers palette -- your path should now be selected. Go to Select › Modify › and Expand the selection by 7px, then feather it by 10px. 
Source : Luxa.org
Photoshop Tutorial : Electrifying Energy Beams
Here's a great effect that will bring some energy to your subject. We'll be wrapping this singer's arm with a glowing beam of light, adding sparkles, and adjusting the colors to make it all seem magical.
Then select the Brush Tool (B) and set your diameter to 7px, with the Opacity and Flow at 100%, and your foreground color set to white. With your path still on the artwork, go back to the Pen Tool, right click on the canvas, and choose "Stroke Path." A menu will appear with the Brush set as the Tool. Check "Simulate Pressure" and press OK. This will make the beginning and end of your stroke thinner.
Now you need to delete the parts you want hidden behind the arm. With your stroke layer selected, choose "Add layer mask" at the bottom of the Layers Palette. Use the Polygonal Lasso Tool (L) to select areas of the arm you want in front of the stroke -- use your eye and imagine how this path will wrap around the arm. Make sure your mask is active by clicking on it, and fill these selected areas with black. They should now be cut out, appearing as if they're behind the arm.
Right click on your stroke layer and choose Blending Options. A Layer Style menu will appear, where you'll be adding an Inner and Outer Glow to the stroke, making the edges of it glow with a blue hue. Use the settings below:

Make a copy of your stroke layer and right click on the Layer Effects icon. Choose "Clear Layer Style" -- we simply want to blur this layer (about 6 pixels) to add another layer of glow. Everything's looking nice and illuminated here, so let�s add some sparkles. With your Brush Tool, add some quick spots around your glowing path with varying small brush sizes (3 - 5px). Make as many as you want here, as you're always free Erase undesired sparkles.


Now select your background photo layer and apply a Plastic Wrap filter, found in your Artistic filters. This will add some wispy lines around your path. Set the Highlight Strength to 20, the Detail to 6, and the Smoothness to 8. Finally, lightly Gaussian Blur your background layer with the feathered selection still active.
0

Skype (Tallin, Estonia)

Digg (San Francisco, AS)

Twitter (San Francisco, AS)


Swatch (Zurich, Swiss)

General Motors (Detroit, AS)


Red Bull (London, Inggris)

Pixar (Emeryville, California, AS)


Coaxis (Portland, Oregon, AS)


Three Rings (San Francisco, California, AS)


Mazzali: “Krea” (Parma, Italia)

M Moser Design House (Hong Kong)

Base One Group (Middlesex, Inggris)

Federal Institute of Technology (Lausanne, Swiss)
20 Best and Elegant Office Design in The World
If we imagine the office was always formal, surrounded by a flat paint without variation and rhythm, a rigid arrangement of furniture, it's time to change that outlook now. Here are examples of leading office interior design world of eye-catching, elegant, and extraordinary breakthrough.
Google (Zurich, Swiss)


Facebook (Palo Alto, California, AS)

Skype (Tallin, Estonia)

Digg (San Francisco, AS)

Twitter (San Francisco, AS)


Swatch (Zurich, Swiss)

General Motors (Detroit, AS)


Red Bull (London, Inggris)

Pixar (Emeryville, California, AS)


Desain Kreatif Lainnya
Technology Center Medical Science (Berlin, Jerman)

Coaxis (Portland, Oregon, AS)


Three Rings (San Francisco, California, AS)


Mazzali: “Krea” (Parma, Italia)

M Moser Design House (Hong Kong)

Base One Group (Middlesex, Inggris)

Federal Institute of Technology (Lausanne, Swiss)
Oktavilla Graphic Design Agency (Stockholm, Swedia)
The Oktavilla Graphic Design designed by Elding Oscarson Architects. The office is housed in the old hall of the former textile factory in Stockholm, Sweden.
Simak
Baca secara fonetik
Parliamentdesign (Portland, Oregon, AS)
Konsultan jasa desain web yang bertempat di Portland, Oregon.
LA Loft (Hollywood, California, AS)
Nendo (Tokyo, Jepang)
Syzygy (Hamburg, Jerman)
Der Tank (Tallin, Estonia)
Ogilvy and Mather (Guangzhou, China)
Selgas Cano Architecture (Madrid, Spain)
Subscribe to:
Posts (Atom)


